Pages

Wednesday 26 December 2018

Foreign Legion Paratrooper platoon

This weekend I also finished a platoon of 1980s French Foreign Legion Paratroopers as a gift for my friend Tim.  I had been buying him packs of 15mm scale modern French infantry & vehicles for a couple of birthdays & Christmases (originally intended for Force on Force games).  As Tim never got around to painting these, I offered to base them up & paint them for our new favoured system, Crossfire, instead.  These were to be his birthday present earlier this year, but I missed that deadline, so here they are finally, as a belated Christmas gift.  I'm even including the convenient mini storage box too :-)

These represent a platoon of Foreign Legion Paras ('Section Bleu'), of the elite 2e REP (2nd Foreign Parachute Regiment).  I've given them Middle East themed bases to match my own Syrian / IDF / PLO collection, as they will be serving in the multi-faction chaos of early 80s Lebanon.

Section Bleu itself consists of an HQ équipe (squad) of platoon leader stand, & accompanying fireteam; & then 3 équipes of 2 fireteams each, plus an équipe leader.  They will be interesting to play, as every équipe includes a sharpshooter with a scoped rifle, which we had decided to house-rule as allowing that fireteam to ignore normal Target Priority rules.  Typical for an elite platoon, this is on the small side for an infantry block (& emphasised further by only having 3 soldiers in each fireteam), but they will make up for this by being elite & having good leadership.

I've also been painting support units for this platoon - 2 sniper teams, 2 GPMG teams, & a Forward Observer for artillery / air strikes, so far.  As a bonus I also put together 3 bases of seriously wounded / dead Paratroopers.  These are just decorative really, to emphasise particularly FUBAR situations...

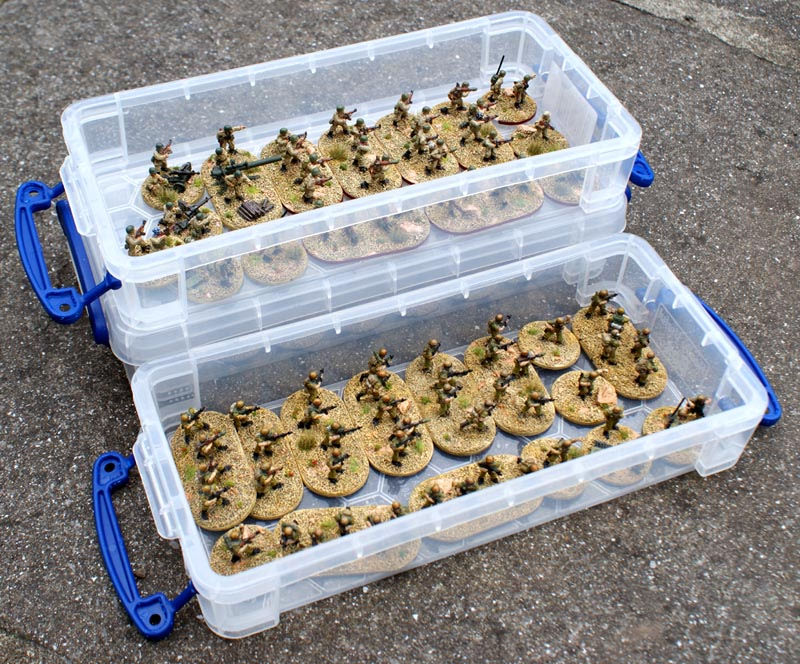
Tim has also purchased enough figures for an additional platoon of 2e REP, which I will paint as 'Section Rouge'. Then I need to get to work on their attached APCs, armoured cars, & MBT...

Here are a couple photos of the platoon & support in their cute little storage / travel box:

Festive Greetings Tim, hope you like them!

Monday 24 December 2018

Ronin board & roads

This weekend I started on my gaming board for Ronin (28mm scale samurai skirmish), & made some roads/tracks for it.  I'd had the 2'x2' compressed chipboard ready for ages, but couldn't decide how to prepare it (PVA + sand + dry-brushing or flock? As earth or grass?).  I eventually decided to get 3'x3' of dark brown felt (£3.50 from the local craft shop), & glue this neatly over the top, around the sides, overlapping the underside.  This results in a nice soft basic gaming surface, with the edges of the board tidy & protected, & the underside cushioned for placing on tables.  I may follow this up by dry-brushing/stippling the felt surface with a lighter brown for a more natural effect, & to blend it in with my other terrain.

When trimming the excess material underneath the board, I had long pieces left over which gave me the idea to see if they would work as flexible roads/tracks which can conform to terrain like hills etc.  A test footpath proved that these would work much better than I expected - they were very simple to produce, & easy to press into shape on a gaming board (unlike flexible roads made of latex or canvas).  I simply cut the roads to size, checking how they could be laid out on the board, & then brushed undiluted PVA glue on each in turn.  I poured a custom mix of flock (1 part dark brown to 2 parts light ochre, with a tiny sprinkle of dark green 'plant' flock) over this, & pressed it down with my fingers (it adhered much more successfully than I expected).  I then added a few patches of yellow-green 'grass' flock, & some small dark green 'plants' along the edges of the roads.

After tipping off what little excess flock there was, & saving what I could for future use, I moved onto the next road, & once the PVA was fairly dry on the whole batch, I gave the lot a spray of matte craft varnish, hoping this would reduce 'flock shedding'.  The varnish has also made the roads feel a little more sturdy.  Very pleased with the results so far.  On the left is a quick shot of the board with some of the scatter terrain that I've already made.  Now to start constructing those buildings, to really bring the setting to life...

Sunday 11 November 2018

Ronin rulers

This weekend I glued together & painted these rather nifty katana rulers for Ronin gaming.  They are simple 4-piece laser-cut MDF items included in this set from Sarissa Precision. The 6" blades are divided into 1" segments, & likewise with the 3" hilts.  Next, I will be painting up some Wound & Stunned markers for Ronin using Ø10mm laser-cut discs.

Saturday 3 November 2018

Crossfire platoon boxes

I've bought a load of these 0.55 litre boxes from Really Useful Products, as they are perfect for storing my 15mm scale Crossfire 'moderns' platoons.  I first spotted one of these pencil-case sized storage boxes in WHSmith, & bought it to try out.  It proved to be the perfect size for efficiently storing a platoon plus a few bases of support, so I bought the rest for cheaper online, direct from the manufacturer.  They are currently £2.37 each.  I may stick some bubble-wrap or foam in the lids to protect the figures more, but I'm really pleased with this storage solution.  Previously I had been storing all of my forces haphazardly in plastic chocolate boxes - these take up up less room, you can see the contents without opening, & they are more convenient for transporting.

Monday 22 October 2018

New Crossfire ID markings

From experience of playing a few games of Crossfire now, I decided to modify how I paint ID markings for my infantry bases.  Playing with more than one platoon quickly demonstrated the difficulty in telling platoons apart (which is necessary for command structure in-game) - so I've settled on painting the edges of my bases in national flag colours to denote platoon, & using small white (or black) bars on the rear centre to denote section (squad) number.  HQ section elements have a wide bar, Section 1 elements have one thin bar, Section 2 have two thin bars, etc.  I was concerned that the coloured edges would be too intrusive visually, but at this scale, & because the players are usually looking down on the tabletop, I think that they strike a great balance between blending-in, being thematic, & being practical.

Here are two examples of this new ID scheme - on the left, my 1980s Syrian AT commandos with dark green edges, which I chose because the stars on the Syrian flag at that time were green, & these are elite fighters; & on the right is one of my Syrian mechanised infantry platoons, with red edges.  I have another mech infantry platoon under construction, which will have white edges, & the other band colour from the Syrian flag, black, will be reserved for if I add another mech infantry platoon to reach a full company.

My two IDF platoons will use blue & white edges, as per the Israeli flag, whilst the two platoons of French Foreign Legion patatroopers (2e REP) that I've been painting up as an overdue gift for my friend Tim will have blue & red edges (Section Bleu et Section Rouge).

Friday 19 October 2018

Moss-covered rocks

A couple more pieces of scatter terrain for Ronin & Chain of Command games - some moss-covered rocks. Same recipe as my other recent pieces: small patches of rocks, & overgrown rocks.

Sunday 7 October 2018

Yakuza gang

Here is my Yakuza buntai (gang/group/band) for Osprey's Ronin skirmish game.  I have chosen to focus on the late Edo period for my collection - the twilight era of the Samurai, as depicted in the 'Zatoichi' & 'Sleepy Eyes of Death' films, 'Yojimbo', 'When the Last Sword is Drawn', '13 Assassins', 'Lady Snowblood', 'Bloody Shuriken', 'Twilight Samurai', & many other classics of Japanese chanbara cinema.  So I have being painting this gang of dastardly Yakuza, who will face justice at the hands of my next buntai - a small group of swordsmen from a Koryu (weapon school).  I may also supplement this with a Peasant buntai, to be terrorised by the local Yakuza.

This is my basic 95 points Yakuza roster - at the front there are five shikaku (thugs) armed with katanas.  The bald bloke in the back row is the gashira with a katana: a lieutenant of the local boss.  He is slightly more skilled than the thugs, & has the Commander ability.  Either side of him are a pair of yotamono (ruffians) with ararebō (small clubs - I made these by trimming down spears, & molding the iron studs using tiny balls of Green Stuff putty).  These ruffians are cheap, & even less skilled than the five thugs, but useful for boosting the numbers... plus the gashira has the option to cut one down as a 'morale booster' if the gang look to be routing in the face of determined foes!  Finally, to the gashira's far left is a thug with a teppo (matchlock arquebus) & katana (although I'm trying to source a sheathed katana for his obi [belt]).

My basic Koryu buntai will also total 95pts, but for comparison, it will feature only three (very skilled) swordsmen.  I have three more figures in progress (two deadly ronin-for-hire, & another teppo gunman) which will bump the Yakuza gang up to 150pts for slightly larger skirmishes; & I can match this for the Koryu by adding three more junior swordsmen.


Here are some close-up photos, showing the patterns that I lavished on much of the clothing for the Yakuza.  I'm pleased with the results - I think it really brings them to life  :-)  I didn't want this buntai to look uniformed, but I did want to tie-them together visually on the tabletop - so I focused the palette around moody blues & purple.

Finally, I couldn't resist reworking a couple of the group shots in black-&-white, to capture the essence of those classic chanbara & Samurai films which have been such an inspiration for this little project.

Most of these figures are from North Star, while the ruffians with converted clubs & the thug with the arquebus are from Perry Miniatures.


Saturday 6 October 2018

Trees

Nothing too exciting today, just some trees which I've based up for use in Ronin & Chain of Command games.  First I glued four 1p coins & one 2p coin on top the laser-cut ply disc bases, to make them nice & weighty on the tabletop, & then I stuck the trees on top, & textured over the coins & between the roots with coarse paint thickener.  Then finished-off with my usual mix of flock & grass tufts, as mentioned in previous posts. 

I've had the trees a few years, so I don't remember the manufacturer, but they are particularly sturdy, & their 'leaves' don't fall off the wire bristles very easily, which means that they're nice & robust for wargaming.

Tuesday 18 September 2018

Small patches of rocks

Some more scatter terrain for Chain of Command & Ronin - a couple small patches of overgrown rocks. These will be difficult ground which hampers movement, but they won't provide cover like my previous larger overgrown rocks.

Again, these are real (painted) stones, mounted on laser-cut ply discs from Fenris Games, with Gale Force Nine flocks & GamersGrass tufts & flowers.

Here are a few photos of these latest rock patches, with a 'White' Russian soldier & a dastardly Yakuza ruffian for scale.

Sunday 16 September 2018

Rickety fences

I recently finished these six sections of rickety fences, for use in Chain of Command (Russian Civil War) & Ronin (late Edo-period chanbara).  They are laser-cut pieces from Fenris Games, affixed using wood glue to large lolly sticks/tongue depressors.  After snipping the long strips of fences into six sections, they were exactly the right length for these lolly sticks (6"). First I textured the bases/strengthed the bond with the fences using ready-mix coarse paint thickener, & then painted the bases with patches of brown & green.  Then I painted the fences using basic drybrushing. Later I glued-on a variety of flock (Gale Force Nine products) & grass/plant tufts (mostly manufactured by GamersGrass).

Here are a few photos of the finished fences, with some 28mm chanbara & RCW figures for scale.  I think they will suit either tabletop battlefield at a pinch.  Which saves time & money!

There are enough strips of rickety fences in the pack to make the same quantity of these again, although I'm considering using them on a field base rather than as individually-placed items.

Monday 27 August 2018

Russian village church

I finally got round to painting this village church for Russian Civil War games.  It's a laser-cut MDF kit from Sarissa Precision.  It was one of their more challenging kits to build because oft he multiple roofs & the crucifix orb, but nothing ridiculous.  I left the roof unglued for access, & painted the interior before gluing the walls to the base.  The building is tall but not that wide, so it's actually a little tricky to place models inside.  But the only viewpoint for those inside is out the doors anyway, so it might not happen that often.

I find these MDF buildings require a couple of spray-coats of undercoat before they're ready to paint, as the material really absorbs the initial coat.  After that they take the paint well.  I used a simple colour scheme based on a few reference photos, & I'm pretty happy with the outcome, although I may add more severe weathering the the wood cladding to 'age' the building a bit more.

I went with a 'gold' theme to highlight the importance the church would have in a village, & because it'll be the centrepiece of many RCW tabletops.  Should make an inspiring focus point for the Whites defending Mother Russia from revolution, whilst the iconoclastic  Reds & Blacks will have less respect for it!